The Easiest Way to draw Realistic hair
- Riddhi Malhotra

- May 2, 2020
- 2 min read
Updated: Oct 21, 2023
Drawing hair is one of my favorite things to do. I've been asked numerous times about how to draw hair that look realistic. There are very easy steps that you can follow to draw hair, and here they are.
Download my free e-book on top 10 tips for acrylic painting

Materials required: A good reference photo, drawing paper, 2B/4B pencils, blending stumps.
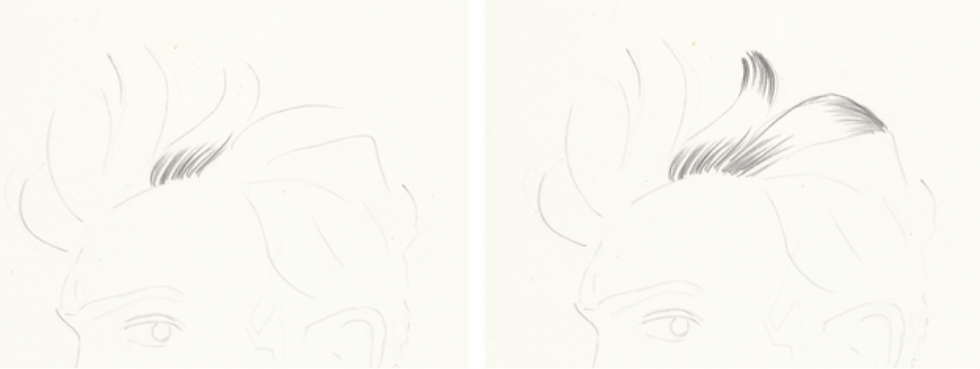
STEP 1: DO NOT try to draw each hair. Draw each bunch of hair, but NEVER each hair.
STEP 2: Draw a faint outline of the portrait using the reference photo:

STEP 3: Pick one bunch of hair, and make loose, dark strokes to draw the roots of the hair. Make similar strokes at the other end of the bunch. (Remember, you’re not drawing each strand. You’re essentially drawing shadows). Don’t let them touch each other. This is important to render the shine in the hair. Let the pencil lift off the paper as you move towards the middle from both ends.
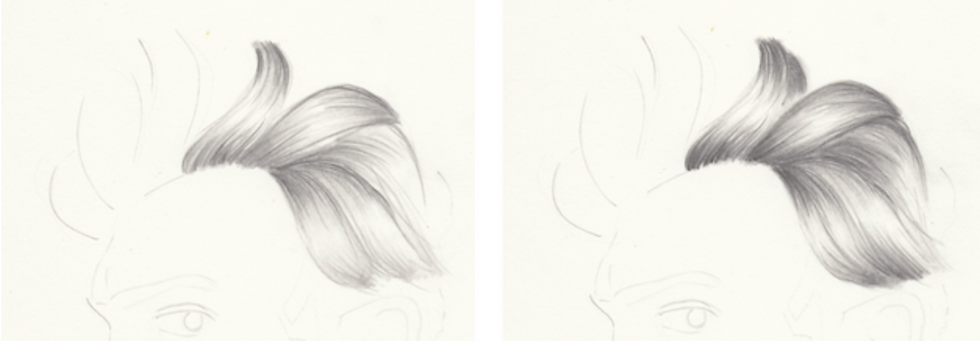
STEP 4: Use a blending stump to smudge out the roots and the outer edge of the hair. Make loose strokes, starting from the darkest end towards the center of the bunch. Let a few strokes run all the way through the center to make it look like a natural shine. Then use a dark pencil to re-do smaller strokes on both ends of the bunch, to hype up the contrast.
STEP 5: Treat each bunch separately, and repeat till you cover the full head. To finish off, erase a few highlights from the middle of the bunches, to give a consistent shine, and smudge out the hairline for a more natural shadowed look.
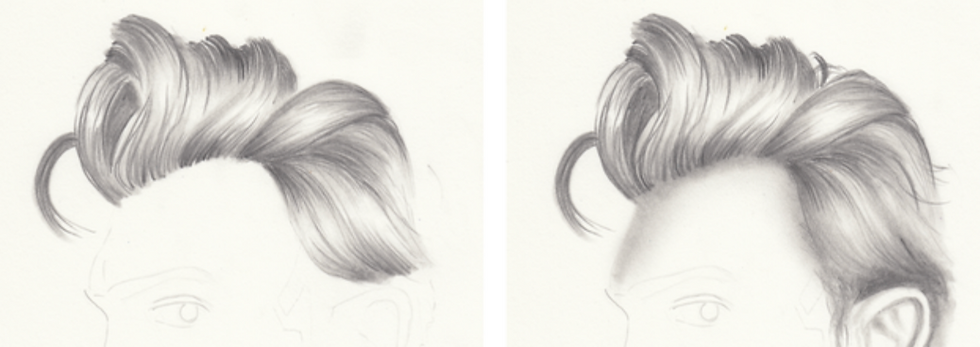
And that, in five easy steps is how to draw hair that looks realistic! It's a little different for longer hair, and that tutorial is coming up soon! Keep practicing :)


https://xosoplus.mobi/xsdl-xo-so-da-lat-cr106.html mình ghé qua thử cho biết vì thấy bạn bè hay share, kiểu xem giao diện là chính. Vào cái là thấy họ chia theo ngày khá gọn, tiêu đề dạng “XSDL ngày 19/07/2026” nhìn phát hiểu ngay đang xem kỳ nào, khỏi phải kéo tìm mệt. Mình thích nhất đoạn kết quả để theo bảng giải, lướt một vòng là nắm được các số chứ không bị dính thành một cục chữ. Kéo xuống dưới còn có khối thống kê lô tô/kép đặt ngay sau phần bảng nên ai hay xem phần đó chắc tiện. Nói chung trang nhìn đơn giản, chữ số căn hàng khá đều, và các heading theo ngày nổi rõ trên nền trắng.
https://keonhacai55.lol/ hôm trước thấy mấy đứa bạn share nên mình bấm vào xem thử cho biết thôi, kiểu lướt qua giao diện chứ không ngồi đọc kỹ hay làm gì nhiều. Ấn tượng ban đầu là trang nhìn khá dễ chịu, không bị rối mắt, khoảng trắng vừa đủ nên nhìn lâu cũng không mệt. Mình để ý mấy khối nội dung được chia rõ ràng, kéo xuống là thấy từng phần tách bạch chứ không dính chùm vào nhau. Có cái menu đặt khá lộ, nên đổi qua lại mấy mục cũng nhanh, không phải tìm mãi. Nói chung mình chỉ xem sơ sơ thôi mà vẫn nắm được bố cục nhờ các khối nội dung và bảng thông…
https://keonhacai.cam/ mình ghé thử vì thấy bạn bè nói qua, kiểu vào xem giao diện cho biết thôi chứ không có thời gian đọc kỹ. Vừa mở lên thấy bố cục khá “dễ thở”, các phần được chia thành từng khối nhìn phát hiểu ngay đang ở đâu, không bị dồn chữ tùm lum. Mình để ý mấy chỗ dạng bảng/cột trình bày gọn, lướt nhanh vẫn bắt được ý chính mà không phải căng mắt. Thanh menu cũng nằm chỗ dễ thấy nên bấm qua lại vài mục khá mượt, không phải kéo lên kéo xuống tìm. Nói chung cảm giác giống như họ sắp xếp mọi thứ theo kiểu ưu tiên nhìn nhanh là hiểu, nhất là mấy…
It would be great if you showed further steps between your last step and the finnished drawing! Thanks!